The Roles Configuration module in Identity Bridge enables administrators to assign templates to identities and manage the values defined within those templates based on certain conditions. This allows for the automated assignment of values to identities, streamlining the management process.
Here’s how it works:
- Templates: Templates in Identity Bridge are predefined sets of values that can be assigned to identities. These values can include attributes such as roles, entitlements, permissions, group memberships, or any other relevant information.
- Role Configuration: Role Configuration is the mechanism through which templates are assigned to identities based on specific conditions. It allows administrators to define rules or criteria that determine when and how a particular template should be assigned to an identity.
- Conditions: Role Configuration allows you to define conditions based on various factors, such as user attributes, group memberships, organizational units, or any other relevant criteria. These conditions can be customized to match the specific requirements of your organization.
- Assignment Rules: Using the Role Configuration module, administrators can create rules that specify which templates should be assigned to identities based on the conditions defined. These rules determine the automatic assignment of templates to identities.
- Automation: The Role Configuration module automates the assignment of templates to identities. When an identity meets the specified conditions, the system automatically assigns the corresponding template and applies the defined values to the identity.
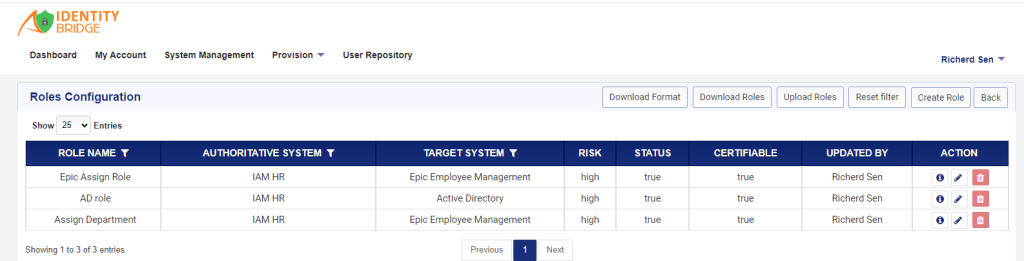
How to create a role configuration
To create Role configuration in Identity Bridge, We have 2 methods.
Manual UI Method:
- Log in to Identity Bridge using your credentials.
- Navigate to the System Management section.
- Find and select the Roles Configuration option.
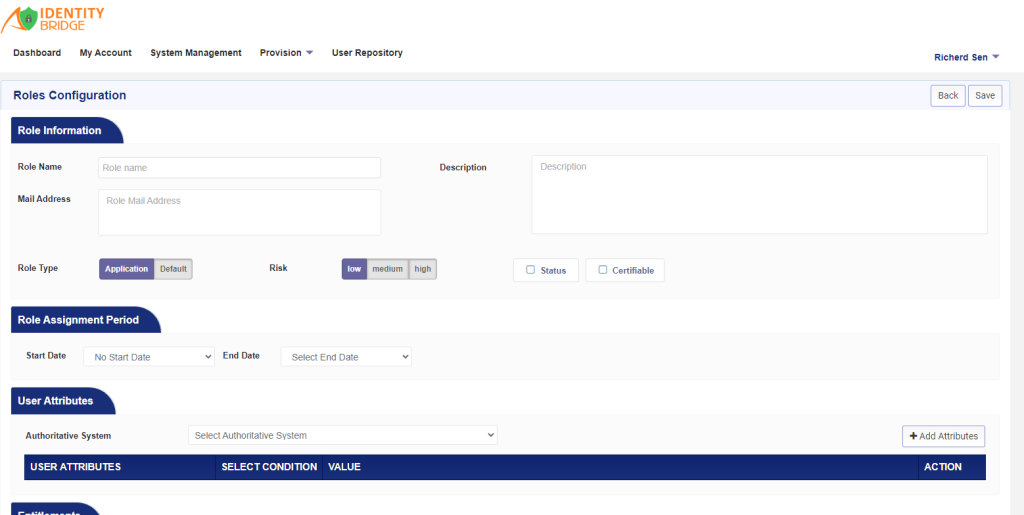
- Click on the “Create Role” button in the user interface.
- Fill in the required fields such as role name, email ID, and description.
- Select the role type, risk, status, and certifiable options.
- Set the role assignment period and select the authoritative system.
- Select the user attribute, set the required conditions for that attribute and enter the value.
- User can select multiple attributes by using the AND and OR conditions also can enter multiple values also.
- Select the target system and click on “Add Entitlement.”
- Choose the required templates for the role.
- Click on “Save” to save the role configuration.
CSV File Upload Method:
- Log in to Identity Bridge using your credentials.
- Navigate to the System Management section.
- Find and select the Roles Configuration option.
- Click on the “Upload roles” option.
- Prepare a CSV file with the necessary role details, including role name, email ID, description, role type, risk, status, certifiable options, role assignment period, authoritative system, user attribute, conditions, target system, and entitlements.
- Upload the CSV file.
- Verify the uploaded data and make any necessary corrections.
- Click on “Save” to save the role configuration.
Note: There is validation that prevents the user to save duplicate Attributes and Templates names.
In the context of Identity Bridge, a “delta update” typically refers to the capability of updating only the changed or modified data in a system, rather than updating the entire dataset. This helps in optimizing the update process by reducing the amount of data that needs to be processed and improving efficiency.
With delta update functionality in Identity Bridge, user can perform incremental updates to the role configuration or any other relevant data without having to re-upload or update the entire dataset. This can be particularly useful when there are frequent changes or updates to roles, attributes, or entitlements, as it saves time and resources.