Mapping the source application attributes to the target application attributes is a crucial step in configuring the data flow between the two applications within the Identity Bridge. The mapping process ensures that the relevant data from the source application is correctly synchronized and mapped to the corresponding attributes in the target application.
Here’s an overview of how the mapping process works :
- Identify source application attributes: Understand the structure and attributes of the source application from which you want to synchronize data. This could include attributes such as username, email address, department, title, etc.
- Identify target application attributes: Determine the corresponding attributes in the target application where you want to map the data from the source application. For example, if the source application has a “department” attribute, identify the corresponding attribute in the target application where you want to synchronize this data.
- Locate the source-to-target mapping: Find the specific mapping configuration for the source application you want to configure. In the identity bridge, we have two methods of attribute mapping, custom mapping and upload mapping through a CSV file.
- Map the attributes: In the mapping configuration, you will typically see a table or form where you can specify the mapping between the source application attributes and the corresponding target application attributes. Use this table to define the mappings by selecting the appropriate attributes from the source and target application attribute lists.
- Save the mapping configuration: Once you have mapped the attributes, save the mapping configuration to apply the changes. This ensures that the data flow between the source and target applications is established based on the defined mappings.
Note : By mapping the source application attributes to the target application attributes, you enable the Identity Bridge to synchronize and update the data between the two applications. This ensures that the relevant user information, access rights, and other attributes are correctly propagated and maintained in both systems, providing seamless integration and consistency in data between the source and target applications.
Methods of Mapping in Identity Bridge
In Identity Bridge, there are typically two methods available for attribute mapping:
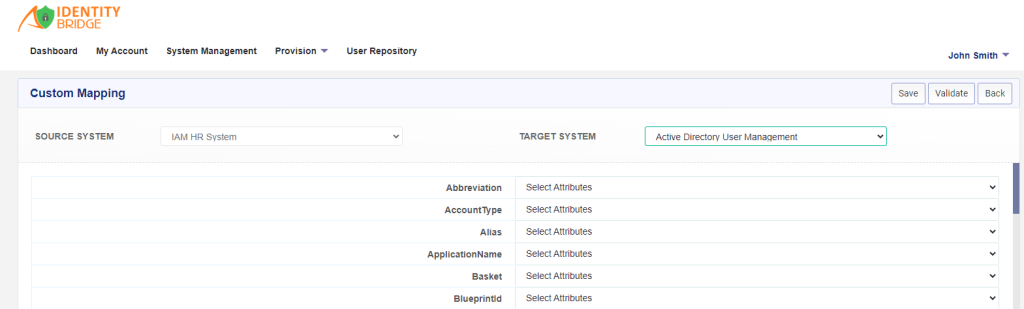
Custom Mapping through UI
This method involves manually mapping the attributes between the source and target applications using the Identity Bridge user interface. In this approach, you can access the mapping configuration section in the Identity Bridge management interface and define the mappings by selecting the appropriate attributes from the source and target application attribute lists. This method allows for flexibility and control over the mapping process, as you can specify the mappings based on your specific requirements and the attribute structures of the source and target applications.
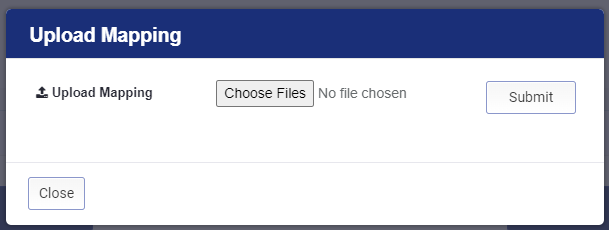
Upload Mapping through CSV File:
Another method of attribute mapping in Identity Bridge is by uploading a mapping file in CSV (Comma-Separated Values) format. With this approach, you can prepare a CSV file that contains the attribute mappings between the source and target applications. Each row in the CSV file represents a mapping, with the source attribute and the corresponding target attribute specified. You can then upload this CSV file through the Identity Bridge user interface, which will read and process the mapping information from the file. This method is useful when you have a large number of attribute mappings or when you want to perform bulk attribute mapping operations.
Steps of source and target attribute mapping:
To map the source and target applications in Identity Bridge, you can follow these steps:
- Log in to Identity Bridge: Access the Identity Bridge management interface using your credentials.
- Click on System Management: Navigate to the System Management section within the Identity Bridge interface.
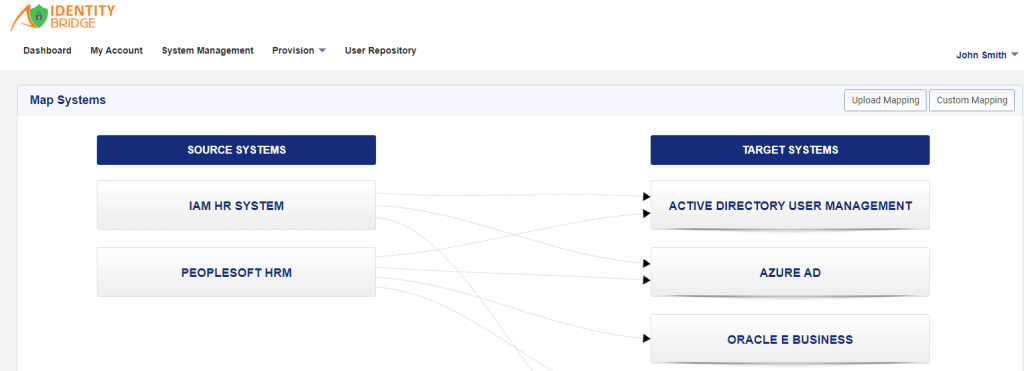
- Open the Map Source: Within the System Management section, select the Map Source option. This will open the attribute mapping configuration page.
- Choose the mapping method: As mentioned, Identity Bridge offers two methods for attribute mapping: uploading a mapping file or custom mapping.
- Select the source and target applications: In the custom mapping section, choose the source application and target application from their respective drop-down menus. These menus will display the available applications within the Identity Bridge system.
- Map the attributes: On the mapping page, you will see the attributes from the source application displayed on the left side and the attributes from the target application displayed on the right side. Map the corresponding attributes by selecting the appropriate attributes from the source and target application attribute lists. You can map multiple attributes as needed.
- Save the mapping: Once you have mapped the attributes, click on the “Save” button to save the mapping configuration. This will apply the attribute mappings and establish the data flow between the source and target applications based on the defined mappings.
Edit the Source and Target Mapping :
To edit the mapping between source and target applications in Identity Bridge, you can follow these steps:
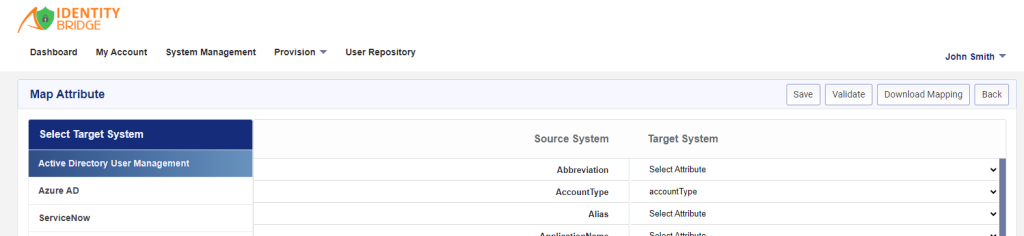
- Go to Map Source: Access the Map Source section within the Identity Bridge management interface.
- Locate the mapped source and target applications: On the main page of the Map Source section, you will see a list of all the mapped source and target applications.
- Choose the source application to edit: Click on the source application for which you want to edit the mapping. This will open a new page specific to that source application.
- Select the target application to edit mapping: On the left-hand side of the page, you will see a list of target application names. Choose the target application for which you want to edit the mapping.
- Edit the attribute mapping: On the right-hand side of the page, you will see the mapped attributes between the selected source and target applications. Here, you can edit the mapping for each attribute. Select the target attribute that you want to map to the source attribute.
- Save the mapping: Once you have made the necessary changes to the attribute mapping, click on the “Save” button to save the updated mapping configuration. This will apply the changes to the attribute mapping between the source and target applications also user can download the mapping in the CSV file format by clicking the “Download Mapping” button available on the top.
- Edit mappings for other target applications: If you want to edit mappings for other target applications, repeat the process by choosing another target application from the list and modifying the mapping accordingly. Save the changes for each target application separately.