Application XML Upload
Defining Jira as a Target application is the first item to be configured to start utilizing Identity Bridge capabilities.
Follow below steps to upload Application XML which defines the target system in Identity Bridge
- Login to Identity Bridge.
- Go to Configuration Hub.
- Go to Configure Source.
- Go to Un-Deployed Sources tab.
- Click on “Add New System”.
- Click on “Upload System File” button. This will open a pop-up window. Choose the Jira application XML file and click on upload.
- As the application gets uploaded, it will redirect the user to the main screen of Configure source.
- Go to Un-Deployed Sources tab again. The uploaded application should be present here.
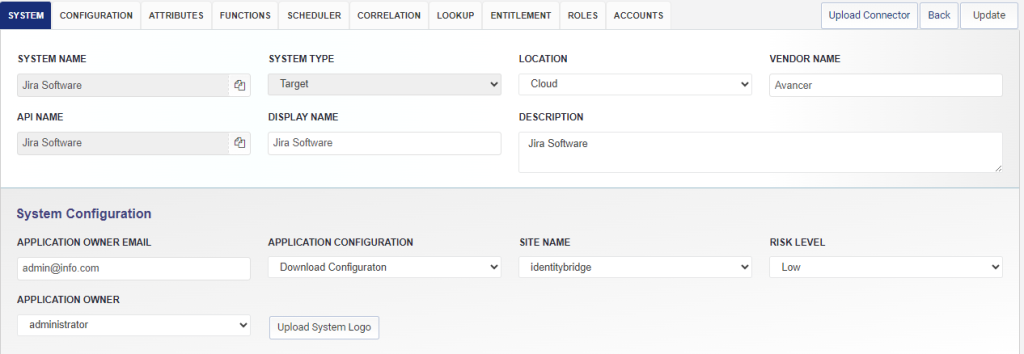
- Now click on the edit option on the application tile. This will open a new window with application details.
- Provide the connection details and update the other details as required. (Please refer to connection parameters section).
- Click on “Update” button to save the details.
- Next, click on “Upload Connector” and upload the connector xml.
- To verify the connector upload, refresh the page and go to configuration at the bottom section where connector details should be visible.
- User can perform the “Test Connection” once the Connector and Connection details are saved.
- Once the application configuration is updated successfully, go to Un-Deployed Sources tab and click the “Deploy” option on the application tile.
Once the application is deployed, the user will be able to perform other operations on the application.
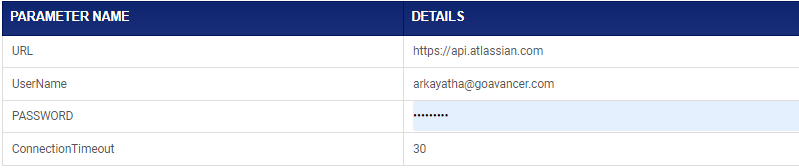
Jira Connection Parameters
The following parameter needs to be provided in application configuration for authorization of bearer token for connecting to Jira.
| Parameter Name | Description |
| URL | Host URL of Jira |
| UserName | Jira Admin ID having required access to perform CRUD over user objects |
| Password | Password for the Jira Admin ID |
| ConnectionTimeout | Connection timeout duration (integer) |
Jira Authentication Parameters
The following parameter needs to be provided in application configuration for authorization of bearer token for connecting to Jira.
| Parameter Name | Description |
| BearerToken | The Bearer Token value generated for authentication in Jira |

Once the connection parameters and authentication parameters are entered correctly, click on the ‘Update’ button to save the changes in application configuration.