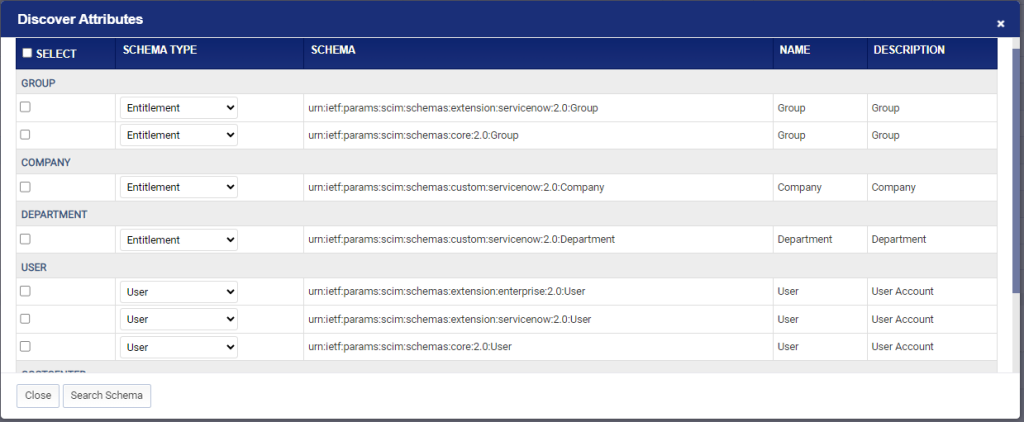
Discover Attributes
Once the functions have been configured, it’s time discover the schema for ServiceNow. Follow below steps to discover and create the attributes for ServiceNow.
- Login to Identity Bridge.
- Go to System Management.
- Go to Configure Source.
- On the ServiceNow tile click on the edit button.
- Click on the Attributes tab.
- Click on the ‘Discover Attribute’ button.
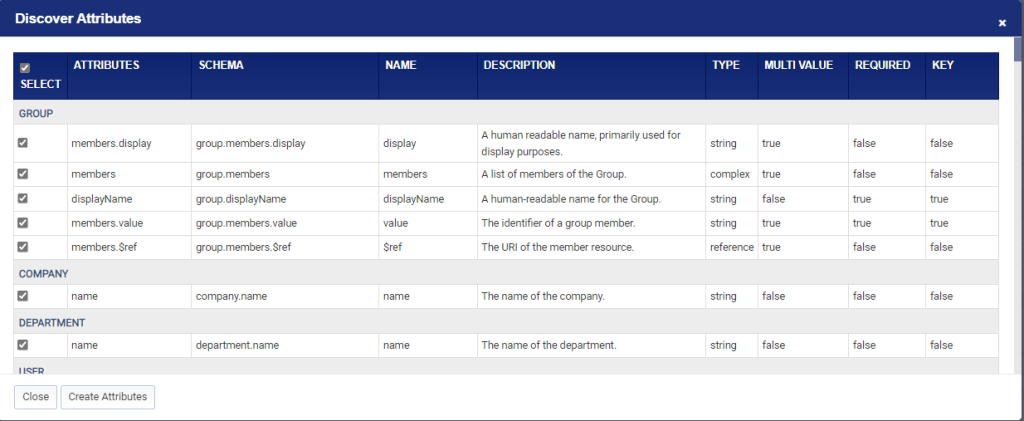
- A new window opens with the discovered schema divided into separate sections for Group, Company, Department, User, Cost Center and Location.
- Select the correct schema type for each section i.e. Schema Type = Entitlement for schemas under Group, Schema Type = Entitlement for schemas under Company, Schema Type = Entitlement for schemas under Department, Schema Type = User for schemas under User, Schema Type = Entitlement for schemas under Cost Center and Schema Type = Entitlement for schemas under Location.
- Once the correct schema types have been selected for each section, click on the Select checkbox on the top row to select all the schemas at once and click on ‘Search Schema’ button.
- The window will refresh to show the list of attributes discovered for the selected schemas.
- Click on the Select checkbox on the top row to select all the attributes and click on the ‘Create Attributes’ button.
- Attributes for ServiceNow will be populated in the Attributes page.
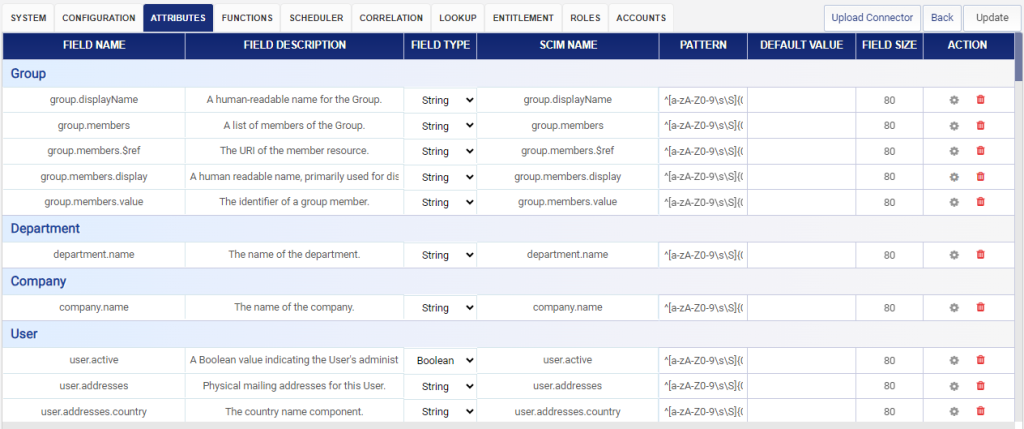
Configure Attributes
Once the functions have been configured, it’s time discover the schema for Salesforce. Follow below steps to discover and create the attributes for Salesforce.
Login to Identity Bridge.
Go to System Management.
Go to Configure Source.
On the Salesforce tile click on the edit button.
Click on the Attributes tab.
Click on the ‘Discover Attribute’ button.
A new window opens with the discovered schema divided into separate sections for Role, Group, User and Entitlement.
Select the correct schema type for each section i.e. Schema Type = Role for schemas under Role, Schema Type = Entitlement for schemas under Group, Schema Type = User for schemas under User and Schema Type = Entitlement for schemas under Entitlement.
Once the correct schema types have been selected for each section, click on the Select checkbox on the top row to select all the schemas at once and click on ‘Search Schema’ button.
The window will refresh to show the list of attributes discovered for the selected schemas.
Click on the Select checkbox on the top row to select all the attributes and click on the ‘Create Attributes’ button.
Attributes for Salesforce will be populated in the Attributes page.
Configure Lookups
Lookup List contains Configuration and Connection.
Configuration means adjusting settings to make things work the way you want them to. In simple terms, configuring an identity bridge is like setting up the rules and parameters that govern how different systems talk to each other and handle user identities. Below are the features of Identity Bridge:
• Allow Multiple Accounts: In context of Identity Bridge, allow multiple accounts means you can use the same login information to access different systems or applications easily.
• Allow Other If Primary Disabled: In the context of Identity Bridge, with this feature if your primary account is disabled for some reason, like if it’s locked or not working properly, you can still use another account to access through Identity Bridge.
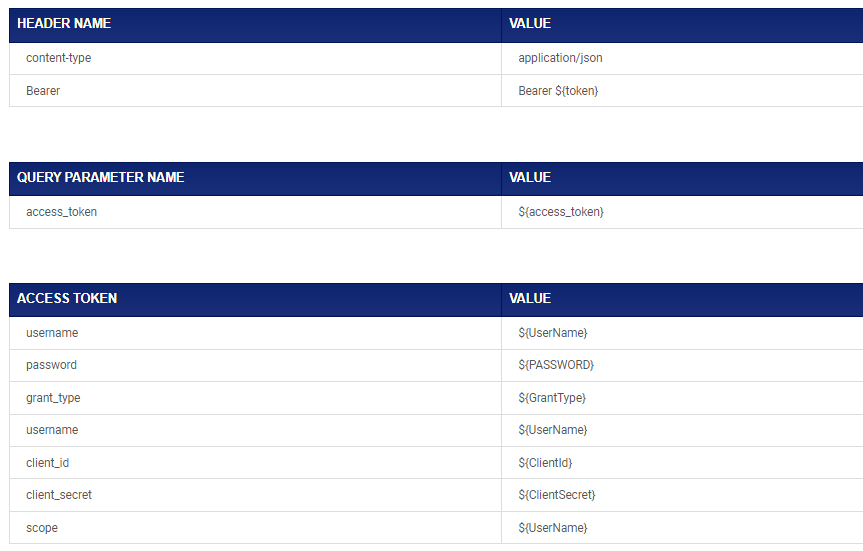
Connection Parameter – OAuth
- ClientID
- GrantType
- ClientSecret
- RefreshToken
- TokenURL
Connection Parameter – BASIC
- URL
- ConnectionTimeout
- UserName
- Password
- Header Name – Content-Type
- Header Name – Authorization
- Query Parameter Name – access_token
Lookups are predefined values for attributes that can be dynamically assigned by Identity Bridge based on the conditions defined in the lookup.
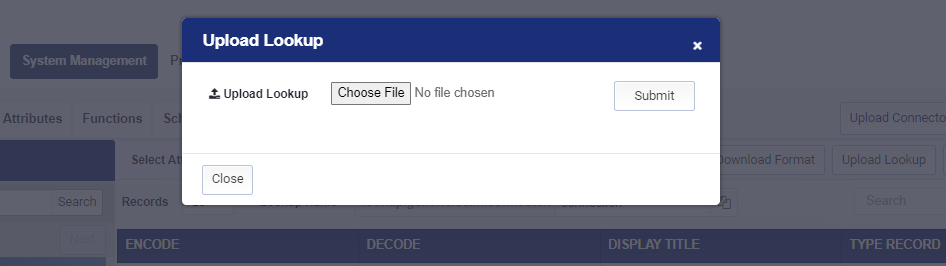
Lookups can be uploaded by following the below process.
- Login to Identity Bridge.
- Go to System Management.
- Go to Configure Source.
- Go to Lookup tab.
- Click on “Upload Lookup” button.
- Browse and select the lookup file.

Make sure to select the correct attribute from the ‘Select Attribute’ drop down and update the lookup type.
For example, select ‘IdentityBridgeConnection’ for connection and ‘IdentityBridgeConfiguration’ for configuration lookup type.
Click on the update button to save the lookup.

The following connection and configuration lookups are required for API provisioning in Salesforce.
- Connection Lookup
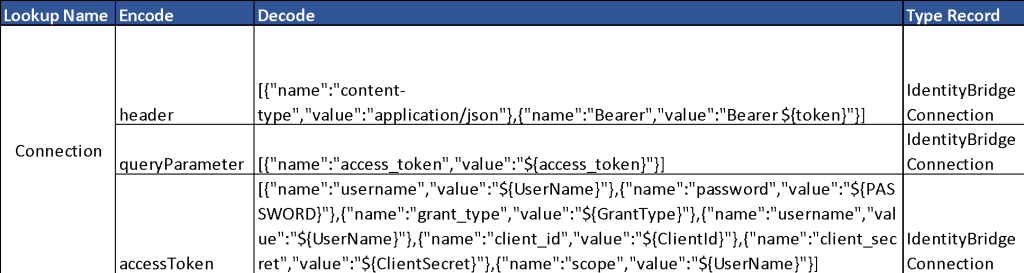
The following connection parameters are configured through the ‘Connection’ lookup.
Configure Functions/Identity Processes
Discover Functions
Once the application connection test is successful, we can proceed to discover the standard functions and configure them. Follow the below steps to configure the functions.
- Login to Identity Bridge.
- Go to System Management.
- Go to Configure Source.
- On the Salesforce tile click on the edit button.
- Click on the Functions tab.
- Click on the ‘Discover Function’ Button.
- This opens a new window with the standard functions for Salesforce connector. Select the functions by checking on the checkbox next to it and click on the ‘Create Function’ button.
- The selected functions appear under their respected sections. Additionally, there are pre-defined System Functions.
- Functions can be configured by clicking on the pencil icon on the respective function tile.

The following functions are supported by Salesforce connector.
System Functions
| Test Connection | |
| Schema | oauth |
| Method | GET |
| Class | com.avancer.identitybridge.scim.test.connection.TestConnection |
| Discover Schema | |
| Action URL | services/scim/v2/Schemas |
| Schema | oauth |
| Method | GET |
| Class | com.avancer.identitybridge.scim.discoverattributes.DiscoverSchema |
| Discover Resource | |
| Action URL | services/scim/v2/ResourceTypes |
| Schema | oauth |
| Method | GET |
| Class | com.avancer.identitybridge.scim.discoverattributes.DiscoverResource |
User Functions
| Create User | |
| Action URL | services/scim/v2/Users |
| Schema | oauth |
| Method | POST |
| Class | com.avancer.identitybridge.scim.createuser.Validation |
| com.avancer.identitybridge.scim.fieldrule.GenerateFieldRuleData | |
| com.avancer.identitybridge.scim.createuser.PreLogging | |
| com.avancer.identitybridge.scim.createuser.CreateUser | |
| com.avancer.identitybridge.scim.createuser.PostLogging | |
| Update User | |
| Action URL | services/scim/v2/Users |
| Schema | oauth |
| Method | PATCH |
| Class | com.avancer.identitybridge.scim.updateuser.Validation |
| com.avancer.identitybridge.scim.updateuser.PreLogging | |
| com.avancer.identitybridge.scim.updateuser.UpdateUser | |
| com.avancer.identitybridge.scim.updateuser.PostLogging | |
| Enable User | |
| Action URL | services/scim/v2/Users |
| Schema | oauth |
| Method | PATCH |
| Class | com.avancer.identitybridge.scim.enableuser.Validation |
| com.avancer.identitybridge.scim.enableuser.PreLogging | |
| com.avancer.identitybridge.scim.enableuser.EnableUser | |
| com.avancer.identitybridge.scim.enableuser.PostLogging | |
| Disable User | |
| Action URL | services/scim/v2/Users |
| Schema | oauth |
| Method | PATCH |
| Class | com.avancer.identitybridge.scim.disableuser.Validation |
| com.avancer.identitybridge.scim.disableuser.PreLogging | |
| com.avancer.identitybridge.scim.disableuser.DisableUser | |
| com.avancer.identitybridge.scim.disableuser.PostLogging | |
| Get User | |
| Action URL | services/scim/v2/Users |
| Schema | oauth |
| Method | GET |
| Class | com.avancer.identitybridge.scim.schedule.aggregation.UserAggregation |
| Get Roles | |
| Action URL | services/scim/v2/Roles |
| Schema | oauth |
| Method | GET |
| Class | com.avancer.identitybridge.scim.schedule.aggregation.RoleAggregation |
Group Functions
| Assign Group | |
| Action URL | services/scim/v2/Groups |
| Schema | oauth |
| Method | PATCH |
| Class | com.avancer.identitybridge.scim.assignentitlement.Validation |
| com.avancer.identitybridge.scim.assignentitlement.PreLogging | |
| com.avancer.identitybridge.scim.assignentitlement.AssignEntitlement | |
| com.avancer.identitybridge.scim.assignentitlement.PostLogging | |
| Remove Group | ||
| Action URL | services/scim/v2/Groups | |
| Schema | Oauth | |
| Method | PATCH | |
| Class | com.avancer.identitybridge.scim.removeentitlement.Validation | |
| com.avancer.identitybridge.scim.removeentitlement.PreLogging | ||
| com.avancer.identitybridge.scim.removeentitlement.RemoveEntitlement | ||
| com.avancer.identitybridge.scim.removeentitlement.PostLogging | ||
| Get Group | ||
| Action URL | services/scim/v2/Groups | |
| Schema | Oauth | |
| Method | GET | |
| Class | com.avancer.identitybridge.scim.schedule.aggregation.EntitlementAggregation | |
The following functions are supported by Salesforce connector.
Configure Functions/Identity Processes
Functions: Functions are application specific procedures, which defines the operations that can be performed on the application.
Function names cannot be deleted or modified once created.
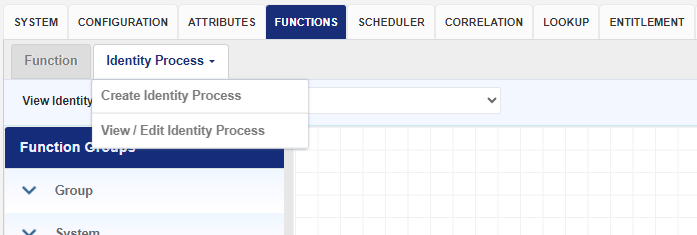
Identity Process: Once the functions have been discovered, it’s required to create required business processes or actions to be performed during user provisioning process using the Identity Bridge functions. These processes are called as Identity Process, which are chain of functions that can be configured to accomplish the requisite user provisioning process as per business logic. We can emulate different provisioning life cycle processes like onboarding, termination, de-activation etc. by creating separate Identity Processes for each provisioning process. Following example illustrates the process of creating an Identity Process for onboarding a user account.
• Login to Identity Bridge.
• Go to Configuration Hub.
• Go to Configure Application.
• Click on the Functions tab.
• Click the Identity Process tab and select Create Identity Process from dropdown menu.
• Enter a name for the Identity Process, onboard_user is the name used in this example.
• From the left pane Function Groups, select the Admin/User function.
• Click and drag Create User function to the empty page on the right-hand side.
• Click and drag account expire function to the empty page on the right-hand side.
• Join the two functions by clicking on the right-hand side node of create user and dragging the line to left-hand side node of account expire function.
• This creates a chain of functions to be executed upon calling the onboard_user Identity Process in the order defined, create user first then account expire in this example.
• Click on the ‘Save’ button above to save the Identity Process. Created Identity Process can be viewed and edited any time by clicking on the ‘View/Edit Identity Process’ option.

Configure Schedule Job
Following task can be accomplished using job scheduler.
Task Automation: Pre-defined tasks for source or target application can be aggregated for data processing, transformation, aggregation and more.
Time-Based Scheduling: it allows users to schedule tasks to run at specific times, such as daily, weekly, monthly, or at intervals specified by the user. This ensures that tasks are executed at the appropriate times without human intervention.
Error Handling and Notifications: In case of error, retry and notifications can be configured.
Jobs in Identity Bridge are functions which can be executed on a schedule to perform routine tasks like aggregation of users, groups, entitlements etc. The following steps explain the process to discover and configure the jobs related to Salesforce.
- Login to Identity Bridge.
- Go to System Management.
- Go to Configure Source.
- On the Salesforce tile click on the edit button.
- Click on the Scheduler tab.
- Click on the ‘Discover Jobs’ button.
- A new window will pop up with the list of jobs for Salesforce.
- Click on the checkbox next to each job tile to select it and click on the ‘Update’ button below.
- Jobs will be populated in the Salesforce application and can be configured from the ‘Automated Provisioning’ section of the Provision menu.

Following jobs are available through the Salesforce connector.
- Salesforce_UserAggregation – This job will fetch the list of all users from Salesforce.

- Salesforce_Group_Aggregation – This job will fetch the list of all groups from Salesforce.

Configure Entitlements
In Identity Bridge, the Entitlement Configuration module allows you to manage and define templates for entitlements associated with the application. Entitlements represent the specific permissions, access rights, or privileges granted to users within the application.
To create an entitlement, follow the steps below:
- Log in to the Identity Bridge system.
- Navigate to the System Management section.
- Find and select the Entitlement Configuration option.
- In the “Select System” dropdown, choose the name of the application you want to configure entitlements for.
- Click on the “Add New Entitlement” button. This will open a separate page for creating a new entitlement.
- On the new page, you have two options:
- Create the entitlement manually by providing the necessary values.
- Upload a CSV file containing the entitlement information. You can download the CSV file format from this page as well. If you choose to upload a CSV file, all the entitlements specified in the file will be created.
- If you decide to create the entitlement manually, enter the required values for the entitlement and click on the “Save” button.
- To edit an existing entitlement, select the application name from the “Select System” dropdown in the Entitlement Configuration section.
- This will display all the entitlement values on the main screen.
- Locate the entitlement you want to edit and click on the “pencil” icon next to it.
- Edit the necessary entitlement values and click on the “Save” button to save your changes.
Note : Entitlement Names cannot be duplicate. If user enters the Entitlement Name multiple times, all the entitlement values will get merged into a single entitlement. Entitlement values, cannot be duplicate. Duplication is based on “Encode (Name)” value.
Configure Roles
The Roles Configuration module in Identity Bridge enables administrators to assign templates to identities and manage the values defined within those templates based on certain conditions. This allows for the automated assignment of values to identities, streamlining the management process.
To create Role configuration in Identity Bridge, We have 2 methods.
Manual UI Method
- Log in to Identity Bridge using your credentials.
- Navigate to the System Management section.
- Find and select the Roles Configuration option.
- Click on the “Create Role” button in the user interface.
- Fill in the required fields such as role name, email ID, and description.
- Select the role type, risk, status, and certifiable options.
- Set the role assignment period and select the authoritative system.
- Select the user attribute, set the required conditions for that attribute and enter the value.
- User can select multiple attributes by using the AND and OR conditions also can enter multiple values also.
- Select the target system and click on “Add Entitlement.”
- Choose the required templates for the role.
- Click on “Save” to save the role configuration.
- CSV File Upload Method:
- Log in to Identity Bridge using your credentials.
- Navigate to the System Management section.
- Find and select the Roles Configuration option.
- Click on the “Upload roles” option.
- Prepare a CSV file with the necessary role details, including role name, email ID, description, role type, risk, status, certifiable options, role assignment period, authoritative system, user attribute, conditions, target system, and entitlements.
- Upload the CSV file.
- Verify the uploaded data and make any necessary corrections.
- Click on “Save” to save the role configuration.
Note: There is validation that prevents the user to save duplicate Attributes and Templates names.
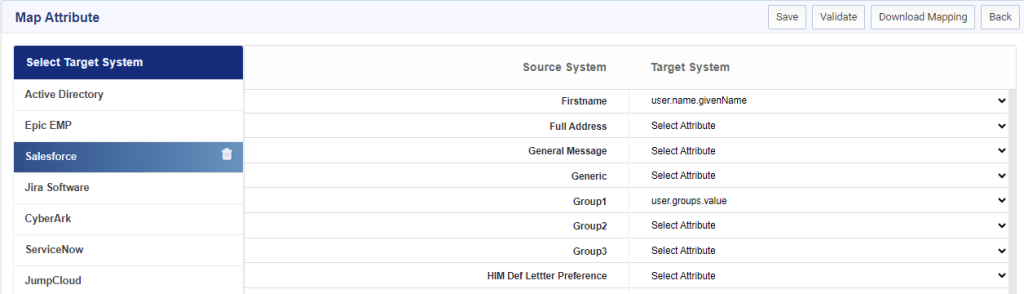
Configure IdentityBridge to Connector Attributes Mapping
Mapping is necessary for downstream flow of data during provisioning to Salesforce. Following is the mapping required in Identity Bridge for user provisioning.
| Source System Attributes | Salesforce Attributes |
| Displayname | user.displayName |
| user.emails.value | |
| EmployeeDemograph | user.emails |
| Entitlement | user.entitlements.value |
| ExternalId | user.externalId |
| Firstname | user.name.givenName |
| Group1 | user.groups.value |
| Lastname | user.name.familyName |
| Role | user.roles.value |
| Status | user.active |
| UserName | user.userName |
| emails.primary | user.emails.primary |
| emails.type | user.emails.type |
Steps of source and target attribute mapping:
To map the source and target applications in Identity Bridge, you can follow these steps:
Log in to Identity Bridge: Access the Identity Bridge management interface using your credentials.
Click on System Management: Navigate to the System Management section within the Identity Bridge interface.
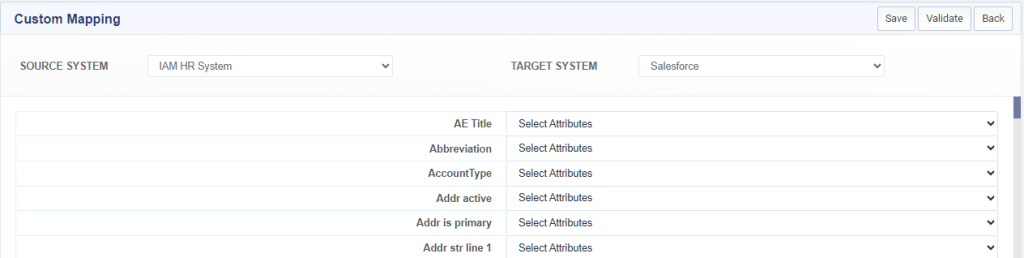
Open the Map Source: Within the System Management section, select the Map Source option. This will open the attribute mapping configuration page.
Choose the mapping method: As mentioned, Identity Bridge offers two methods for attribute mapping: uploading a mapping file or custom mapping.
Select the source and target applications: In the custom mapping section, choose the source application and target application from their respective drop-down menus. These menus will display the available applications within the Identity Bridge system.
Map the attributes: On the mapping page, you will see the attributes from the source application displayed on the left side and the attributes from the target application displayed on the right side. Map the corresponding attributes by selecting the appropriate attributes from the source and target application attribute lists. You can map multiple attributes as needed.
Save the mapping: Once you have mapped the attributes, click on the “Save” button to save the mapping configuration. This will apply the attribute mappings and establish the data flow between the source and target applications based on the defined mappings.