Once the application connection test is successful, we can proceed to discover the standard functions and configure them. Follow the below steps to configure the functions.
- Login to Identity Bridge.
- Go to Configuration Hub.
- Go to Configure Source.
- On the ServiceNow tile click on the edit button.
- Click on the Functions tab.
- Click on the ‘Discover Function’ Button.
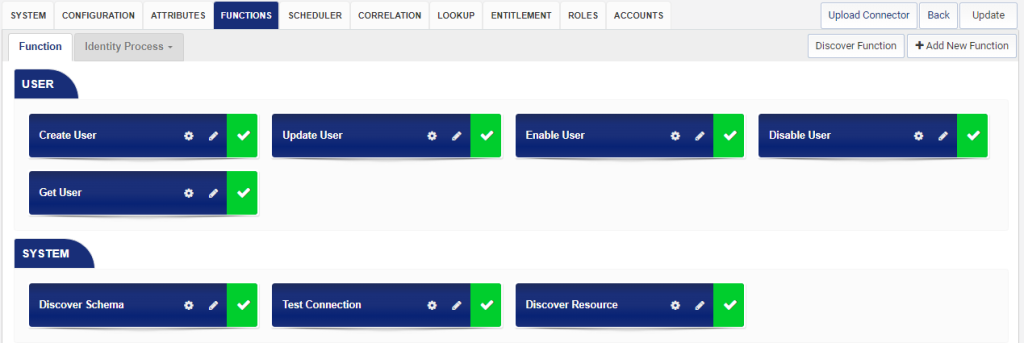
This opens a new window with the standard functions for ServiceNow connector. Select the functions by checking on the checkbox next to it and click on the ‘Create Function’ button.
The selected functions appear under their respected sections. Additionally, there are pre-defined System Functions.
Functions can be configured by clicking on the pencil icon on the respective function tile.
The following functions are supported by ServiceNow connector.
System Functions
| Test Connection | |
| Schema | basic |
| Method | GET |
| Class | com.avancer.identitybridge.scim.test.connection.TestConnection |
| Discover Schema | |
| Action URL | api/now/scim/Schemas |
| Schema | basic |
| Method | GET |
| Class | com.avancer.identitybridge.scim.discoverattributes.DiscoverSchema |
| Discover Resource | |
| Action URL | api/now/scim/ResourceTypes |
| Schema | basic |
| Method | GET |
| Class | com.avancer.identitybridge.scim.discoverattributes.DiscoverResource |
User Functions
| Create User | |
| Action URL | api/now/scim/Users |
| Schema | basic |
| Method | POST |
| Class | com.avancer.identitybridge.scim.createuser.Validation |
| com.avancer.identitybridge.scim.fieldrule.GenerateFieldRuleData | |
| com.avancer.identitybridge.scim.createuser.PreLogging | |
| com.avancer.identitybridge.scim.createuser.CreateUser | |
| com.avancer.identitybridge.scim.createuser.PostLogging | |
| Update User | |
| Action URL | api/now/scim/Users |
| Schema | basic |
| Method | PUT |
| Class | com.avancer.identitybridge.scim.updateuser.Validation |
| com.avancer.identitybridge.scim.updateuser.PreLogging | |
| com.avancer.identitybridge.scim.updateuser.UpdateUser | |
| com.avancer.identitybridge.scim.updateuser.PostLogging | |
| Enable User | |
| Action URL | api/now/scim/Users |
| Schema | basic |
| Method | PATCH |
| Class | com.avancer.identitybridge.scim.enableuser.Validation |
| com.avancer.identitybridge.scim.enableuser.PreLogging | |
| com.avancer.identitybridge.scim.enableuser.EnableUser | |
| com.avancer.identitybridge.scim.enableuser.PostLogging | |
| Disable User | |
| Action URL | api/now/scim/Users |
| Schema | basic |
| Method | PATCH |
| Class | com.avancer.identitybridge.scim.disableuser.Validation |
| com.avancer.identitybridge.scim.disableuser.PreLogging | |
| com.avancer.identitybridge.scim.disableuser.DisableUser | |
| com.avancer.identitybridge.scim.disableuser.PostLogging | |
| Get User | |
| Action URL | api/now/scim/Users |
| Schema | basic |
| Method | GET |
| Class | com.avancer.identitybridge.scim.schedule.aggregation.UserAggregation |
Creating Identity Process
Once the functions have been discovered, it’s required to create required business processes or actions to be performed during user provisioning process using the Identity Bridge functions. These processes are called as Identity Process, which are chain of functions that can be configured to accomplish the requisite user provisioning process as per business logic. We can emulate different provisioning life cycle processes like onboarding, termination, de-activation etc. by creating separate Identity Processes for each provisioning process. Following example illustrates the process of creating an Identity Process for onboarding a user account.
- Login to Identity Bridge.
- Go to System Management.
- Go to Configure Source.
- On the ServiceNow tile click on the edit button.
- Click on the Functions tab.
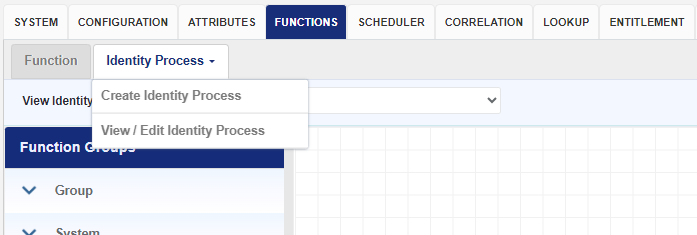
- Select the Identity Process tab and click on the Create Identity Process option.
- Enter a name for the Identity Process, onboard_user is the name used in this example.
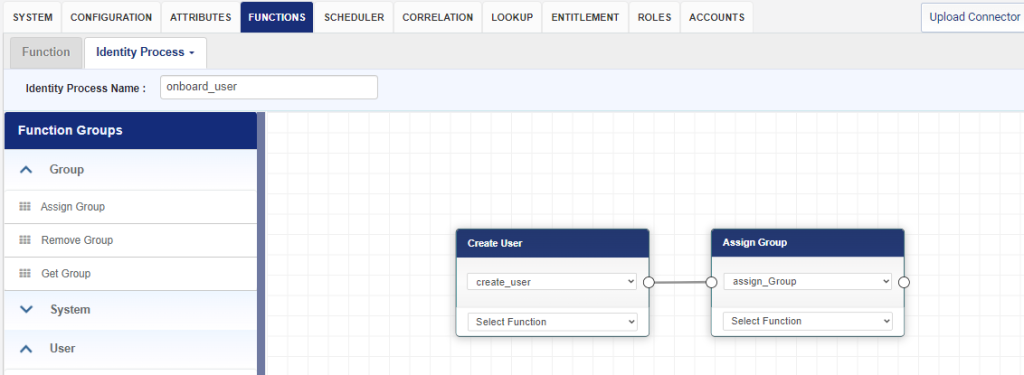
- From the left pane Function Groups, select the create_user function.
- Click and drag the function to the empty page on the right-hand side.
- Next select the assign_group function from left hand side and drag and drop on the page next to the create_user function.
- Join the two functions by clicking on the left-hand side node of create_user and dragging the line to right-hand side node of assign_group function.
- This creates a chain of functions to be executed upon calling the onboard_user Identity Process in the order defined, create_user first then assign_user in this example.
- Click on the ‘Save’ button above to save the Identity Process. Created Identity Process can be viewed and edited any time by clicking on the ‘View/Edit Identity Process’ option.